Creating Email Campaigns
Campaign Source
When building an Email Campaign, Marigold Engage+ supports two different data sources:
-
A table in the Engage+ database
-
The Engagement Data Platform (EDP)
The Campaign creation steps and features vary slightly between the two data sources. These differences are called out below, where applicable.
Campaign Creation
1. Create a New Campaign
Once reusable items (such as Filters, Content Blocks, Opt-out Messages, etc.) have been created, the Email Campaign is ready to be created.
1. In the Main Menu, select Production > Campaigns.
2. In the Tool Ribbon, click New Campaign.
3. Fill out the Campaign details:
-
Where: Select the folder for the Campaign
-
Name: Enter a unique descriptive name for the Campaign
-
Source: Select Engage+ or EDP
-
Data Source: If using Engage+, select the Campaign's source table
-
Type: Select the Campaign type
-
Channel: Select Email
4. Click Create.
2. Create Campaign and Upload Assets
The method described above for creating a Campaign creates an "empty" Campaign with no content or assets. You can optionally also create a Campaign and upload assets into it at the same time.
Note: The Campaign upload feature is not available for EDP Campaigns.
Assets must be zipped together in a single .zip file. All images must be in a folder called "images." HTML and Text file names and extensions can't include spaces, capital letters, or special characters.
1. In the Admin Banner Bar, select New > Create Items.
2. In the Tool Ribbon, click Upload.
3. Navigate to the .zip file that contains the Campaign content and assets.
4. Click Open. The "Uploaded Items" pane opens on the right, displaying the items from the .zip file.
5. In the left panel, select Campaigns.
6. Fill out the Campaign details:
-
Folder: Select the folder for the Campaign
-
Name: Enter unique descriptive name for the Campaign
-
Data Source: Select the Campaign's source table
-
Campaign Type: Select the Campaign type
-
Channel: Select Email
-
Encoding: Select the encoding method
-
Email HTML: Select the HTML file that was uploaded with the .zip file
-
Email Text: Select the text file that was uploaded with the .zip file
7. On the Tool Ribbon, click Save.
Campaign Setup
The Campaign screen is split into multiple sections accessible via a series of tabs across the top of the screen. The first tab, Setup, is where you configure high-level information about the Campaign.
3. Select the Content Type
You can provide the message content using the Content Editor, or you can use another Engage+ asset as the source of the Campaign content.
Note: If you use another asset, ALL Campaign content will be pulled in from that asset. You won't be able to manually enter HTML into the Campaign content.
1. From Campaign pages, in the toolbar go to More Actions (three dots), then select Change Content Type.
2. Select the source of the Campaign content:
-
Provide Content: The default option; allows you to enter HTML.
-
Dynamic Block: Browse to and select the desired Dynamic Block.
-
Content Block: Browse to and select the desired Content Block.
4. Identify the Campaign audience
The Audience section is used to identify the Campaign's intended audience of recipients. The options in this section vary based on whether the Campaign's source is a Messaging table or the EDP.
For Campaigns based on an Engage+ table:
1. Click the Setup tab.
2. Use the Search tool on the "Filter" field to browse for an existing Filter; or use the New tool to create a new Filter.
3. If the Campaign source table contains more than one Email-type field, select the Email Address field you want to use by selecting it from the Destination Field drop-down menu.

Hint: By default, the audience for an Event-triggered Campaign is "all triggered records." Optionally, you can select a Filter if you need to apply additional restrictions to identify and select only a sub set of the triggered records.
For Campaigns based on the Engagement Data Platform:

1. Click the Setup tab.
2. From the Data Version drop-down menu, select either:
-
Member Record: Use the primary Member Record within the EDP database.
-
Campaign-ready file: Select a filename for the desired campaign-ready import file.
3. If you selected a Campaign-ready file above, you're not required to select an Audience, as the contents of the file determine the intended recipients. Optionally, to apply an Audience to the Campaign-ready file, from the Advanced Options drop-down menu, select Add Audience Filter.
4. Click Browse for Audience. The Select EDP Audiences pop-up window is displayed.
5. Optionally you can search for an Audience by name using the Search field. You can also sort the list of Audiences by name, created date, or updated date.
6. Click on the desired Audience then click Select.
5. Set the event trigger
For Event-triggered Campaigns, you must configure the event that will trigger the deployment of the Campaign.
1. Within the Triggers section, select Add Event Trigger located on the right.
2. From the Add Trigger window, select a Trigger type.
3. Select the criteria for the Trigger.
4. Click OK.

6. Identify the Sender Profile
The Sender Profile defines the domain from which the Campaign will be sent, and also controls the recipient's eligibility to be contacted.
For Campaigns based on a Engage+ table:
1. In the Sender Profile section, select a Sender Profile from the drop-down menu
2. If the selected Sender Profile has more than one VMTA pool associated to it, select the desired VMTA pool.
3. The Message Subscriptions area will appear only if the selected Sender Profile has this enabled. If displayed, define the logical condition for the Preference flags:
-
In the Message section, from the first dropdown, select either be subscribed or not be subscribed.
-
From the second drop-down menu, select either ANY (that is, an OR condition), or ALL (that is, an AND condition).
4. Select Add Message Subscription from the drop-down menu, and click the Add button. Repeat this step as needed.
Note: If the Campaign's Filter uses Message Subscriptions as logical criteria, you can click Add From Filter to have the system parse the Filter and automatically display all Preference flags found within the Filter logic.

For Campaigns based on the Engagement Data Platform:
1. In the Sender Profile section, select a Sender Profile from the drop-down menu.
2. If you're using Message Subscriptions as an additional level of permission management, define the logical condition for the selected Message Subscriptions:
-
From the first drop-down menu, select either be subscribed or not be subscribed.
-
From the second drop-down menu, select either ANY (that is, an OR condition), or ALL (that is, an AND condition).
3. Select a Message Subscription field from the drop-down menu, and click the Add button. Repeat this step as needed.
7. Build the Campaign envelope
1. In the Envelope section, enter or select the message header information:
-
From Address (aligned with Sender Profile)
-
From Name (aligned with From Address)
-
To Name (defaults to recipient’s first and last name)
-
Subject Line / Preheader Text (Optional: Use AI Assist and fill out the prompt. Click Generate)
-
Encoding method (defaults to UTF-8)
2. In the ToolBar, click Save.
Campaign Content
The second tab, Content, is used to enter or edit the content of the email message.
8. Edit the message
Use database fields for personalization, or select merge codes for reusable items, and links to the online and viral versions of the Campaign.
1. Click Content (or click Next at the bottom of the screen).
2. Click the Personalization & Library Panel on the right side of the screen to expand it.
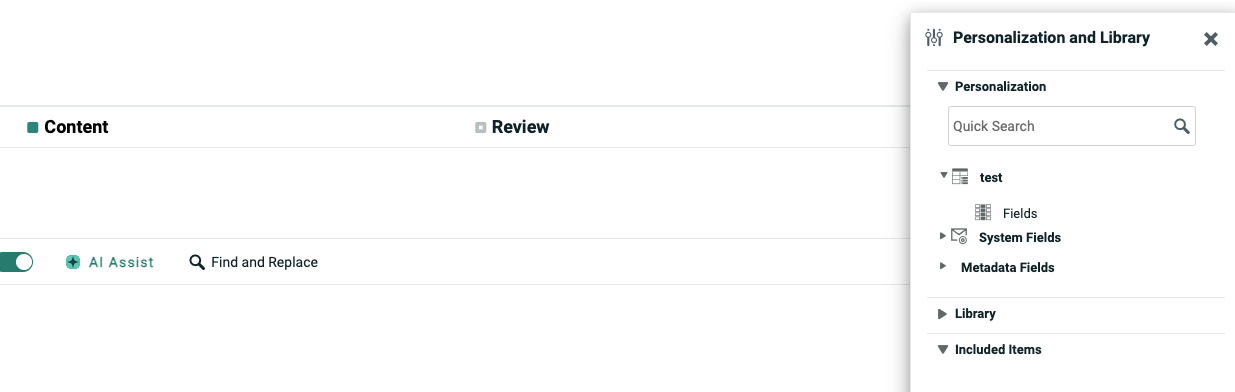
3. From the Personalization & Library Panel, select an item to be used in the email.
4. An item from the Personalization & Library Panel can be added, either by:
-
Drag-and-drop: Drag-and-drop the item from the Personalization & Library Panel directly into the desired position on the content area.
-
Double-click: Position the cursor in the desired position within the content area, then double-click the item in the Personalization & Library Panel.
5. Repeat the above steps until all items have been inserted into the message content.
-
After you add a personalization field or other asset to the message content, its Merge Symbol is added to the Included Items section of the Personalization & Library Panel. This section makes it easier to find and reuse Merge Symbols elsewhere in the message.
Note: For EDP-driven Campaigns, only the fields marked as "Use in Messaging" will be available in the Personalization & Library Panel. Likewise, if you have a Cheetah Loyalty account, and want to use Loyalty Content Tokens in the message content, you must first mark the desired Content Tokens as "Use in Messaging." See the Enable EDP Fields Quick Card for more details.
6. Click Save.
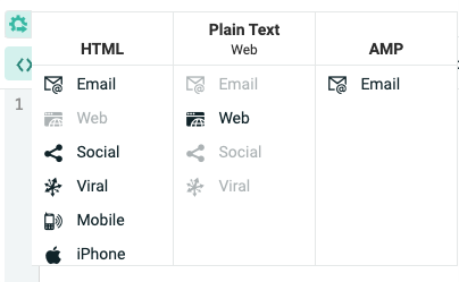
9. Promote additional versions of the message
The platform will show different versions of the Campaign as separate tabs in the Content Editor (such as "HTML" and "Plain Text" for example). You can create additional versions, such as a "View as Web Page" version and a "Viral" version.
1. Click the cog icon next to the HTML or Text tab.
2. Click-and-drag the desired version name to the right. A new tab opens for the new version of the message.
3. Edit the new version as necessary.
4. Click Save.
10. Preview the email
You can preview the email and check if the creative is correct.
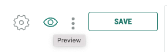
1. Click Preview.
2. To test the Personalization fields, select the Personalization tab. Either:
-
Enter a recipient email address in the "Email Record Lookup" field to refresh the preview with the data from that record.
-
Enter Personalization values; the preview rendering is refreshed.
3. To test Dynamic Content, select the Dynamic Content tab. Check the desired Dynamic Content variant. The preview rendering is refreshed.
4. When finished, click the back arrow icon on the left next to Preview.
